How to Configure User Quota in Windows Crackiworld4u
Enabling quota management for hard disk can help you limit disk space usage for new users, set warning level for disk usage limit and complete other settings. Thus, this article shows you how to enable it on Windows 10 computer
Steps :
1. Create a Normal User
press windows key -> type cmd then select cmd { right click } -> click run as administrator
command type :
net user username /add = Create a New User
net user username * = Create password
2. open my computer
-> select any drive -> then right click -> click properties -> click quota tab -> click show quota setting
-> Check Mark Option
[*] Enable quota management
[*] Deny disk space to user exceeding quota limit
-> click Quota Entries
-> click quota tab
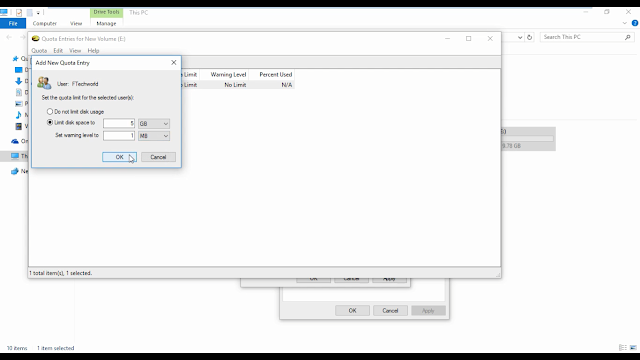
-> click new quota entry ->click advanced -> find now -> select user
Then OK -> OK
[*] limit disk space [10] [GB]
set warning level [1 ] [GB]

click OK -> click apply -> OK -> OK -> OK.
3. user logout
windows + L
-> new user login
open my computer. windows +E .
YouTube :
Steps :
1. Create a Normal User
press windows key -> type cmd then select cmd { right click } -> click run as administrator
command type :
net user username /add = Create a New User
net user username * = Create password
2. open my computer
-> select any drive -> then right click -> click properties -> click quota tab -> click show quota setting
-> Check Mark Option
[*] Enable quota management
[*] Deny disk space to user exceeding quota limit
-> click Quota Entries
-> click quota tab
-> click new quota entry ->click advanced -> find now -> select user
Then OK -> OK
[*] limit disk space [10] [GB]
set warning level [1 ] [GB]

click OK -> click apply -> OK -> OK -> OK.
3. user logout
windows + L
-> new user login
open my computer. windows +E .
YouTube :
YouTube Link : How to Configure User Quota
Baca Juga


![BlackArch ISO Download [ LATEST ISO ] Hacking New Operating System BlackArch ISO Download [ LATEST ISO ] Hacking New Operating System](https://blogger.googleusercontent.com/img/b/R29vZ2xl/AVvXsEifdkdiu8cOsAnCO8FOnENyPzx1ZwLTSf4IVMf30DN5ov8qqD3sp9yuB0gUZFUrgTQ3qocMbC5Qw7ZrAb900KIFy35VSRRLDCh7no_VcwoSWauOAkWNonl-BbWYZutiF79QJBHw8AWSIgY/w100-h100-p-k-no-nu/crackiworld4u+%25281%2529.jpg)

![AdGuard Premium 2.10.176 Final [Premium - Block Ads Without Root] AdGuard Premium 2.10.176 Final [Premium - Block Ads Without Root]](https://blogger.googleusercontent.com/img/b/R29vZ2xl/AVvXsEhEsEOBP9zlMkV7KefQt5eLt1M1SqcgVg4qfgadESjGB63mL6TmVmSkdztFQbepuotYQYgKNPLbErAl7Q3tDYlAtkp0yuggVINncn9AeWmG9lS27285rdonvHo3NsY9Lst_4LnMvx9jVPk/w100-h100-p-k-no-nu/crackiworld4u.jpg)

Post a Comment
Post a Comment